
by Bryan Fischer, Curator and Horticulturist, Gardens on Spring Creek
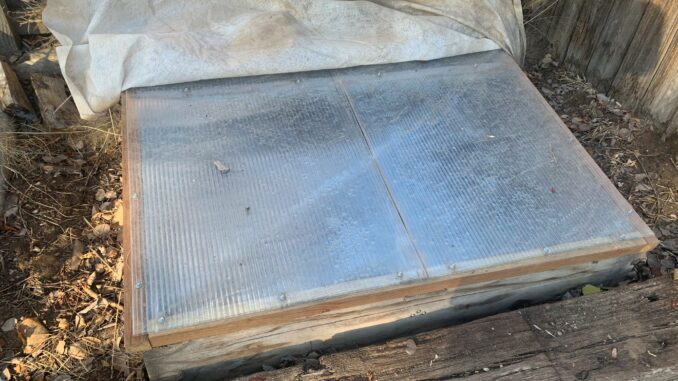
Last spring, I built a cold frame. I’m far more a plantsperson than a carpenter, and the affair cost me an afternoon and a hundred bucks. Intended initially to harden off my spring starts, I quickly found it so helpful that I produced a second. I affixed both with non-electric, automatic vent openers, which ran about $60 each. For the resulting $300 or so, I’ve been able to start and harden hundreds of dollars worth of plant material in spring on a heat mat in my third bedroom with little fuss. I have been able to overwinter similar amounts of plant material.
I wish I had done so sooner, as these frames have been one of the biggest conveniences in my home garden since. They’ve saved me from “the great shuffle”–an obnoxious affair that involves running tender seedlings in and of the house for a few hours more each day to acclimate them to outdoor conditions after being sprouted inside (called hardening them off). Now, I just set the cold frame in a part sun location and the seedlings can go right in. Two weeks of watering later, and they are fully hardened, ready to plant, and look better than their dizzied counterparts.
If space allows, I use the frames to jump-start my cool season veggies, too. Direct sown, these pop up right in the frame (I left an open bottom for this) and benefit from warmed soils and insulated air inside the space. Starting three weeks earlier, I’ll harvest these carrots, beets, and leafy greens sooner than I would their outdoor counterparts. As these crops come out, I’m filling their space with more tender tomato and pepper starts, which harden in two weeks and then are planted the weekend after Mother’s Day. At this point, I just pick the cold frame up and store it on it’s side behind my undeniably ugly garden shed.
By late summer, I’m direct sowing my fall set of cool-season veggies. If done thoughtfully, I’ll shape the bed so the cold frame can go right over the top. It will help to extend the harvest of these crops by another few weeks, providing particularly sweet carrots and greens – many veggies are sweeter if exposed to near or barely freezing temperatures, but avoiding a hard freeze like a cold frame can provide.
As the frame empties (and my salads grow), I begin to stick any high-value (like hard-to-find or original) plant material in the frame. If in a quart size or larger pot, most hardy plants overwinter well in a frame of this nature. To help provide some insulation, I just tuck plants in with a layer of frost blanket on the frame’s interior and then add another layer outside to moderate daytime warming while plants are dormant. Come spring, these plants will break dormancy earlier and be hardened and ready to plant.
For particularly cold nights or more tender crops, I occasionally include a few jugs of water in the back of the frame. With the highest specific heat capacity of any liquid, water does a great job of preventing freezing in the frame. While not effective in mid-winter, just a few jugs can make a big difference in a small frame during the shoulder seasons, similar to how a couple of frames made a big difference in my home gardening process. So, whether you’re a plant person, a carpenter, or neither, consider a cold frame if simplifying your propagation and maximizing your shoulder season harvest sounds appealing.
Support Northern Colorado Journalism
Show your support for North Forty News by helping us produce more content. It's a kind and simple gesture that will help us continue to bring more content to you.
BONUS - Donors get a link in their receipt to sign up for our once-per-week instant text messaging alert. Get your e-copy of North Forty News the moment it is released!
Click to Donate
